Happy New Year from Convoy HQ! As 2016 kicks into gear, we’re excited to be trying out some new things in the office.
Just before the new year, we kicked off a large web project: we’re currently working on redesigning a niche classroom resource site for K-12 teachers. The old site is impressively usable, given that it was built in 2007, but it’s definitely time for a refresh. Before we launch into the wireframing and the interface design, though, we need to determine a few things:
1. How have teachers’ classroom needs and resources changed since 2007? The site we’re redesigning is older than the first generation of iPhone, and a lot has happened to tech and the internet in those nine years. Google Apps, Chromebooks, SmartBoards–these things that didn’t exist when the original site was built are now integral not just to our daily lives but to many teachers’ experiences of teaching their students. How has their arrival changed what teachers need from resources they find online?
2. The old site is still in use by many instructors. What’s still working well? What do they like about it? We can guess at these things, but no amount of guesswork, even by web professionals, can substitute an actual teacher’s perspective on this matter.
3. Where does the old site fail in terms of usability, given what teachers need? This will guide our attempts to improve it. Again, we have our guesses–but what better way to know for sure than to have actual teaching professionals try to do things on the site while we watch?
We knew we wanted to interview teachers about their experiences with online resources in the classroom, and we knew that we wanted to do some usability testing on the current site to help identify the stumbling blocks. We tracked down some teachers who were willing to help, and then we needed to figure out the logistics.
We knew we would be testing remotely, potentially talking to teachers across the country, and we had a few criteria for any piece of software we used to interview and test:
1. We wanted something we could use both for interviewing teachers, and for viewing their screens as we asked them to complete some usability tasks with the current sites.
2. Ideally, we wanted to be able to record our sessions to reference them later. We were especially interested in recording the teachers’ screens during the usability portion of the exercise.
3. We wanted to do this as simply as possible, and ideally not require teachers to install any new software, or at the very least, nothing cumbersome. Our interviewees are busy, might not have the necessary permissions to install software on their machines, or they might simply not be very tech savvy. Whatever the case may be, we wanted to make this as easy on our test subjects as possible.
4. If possible, we wanted the software we used for this process to be free.
Number three proved to be the trickiest point. There are plenty of great services for remote meetings, but most platforms require all parties to have some sort of software installed if you want to participate in screen sharing. Then we stumbled onto an idea: many schools now are transitioning to the use of Google Docs and other Google products of save money on things like the Microsoft Office Suite. If our teachers already had Google accounts and Chrome, could we use Google Hangouts?
A quick (Google) search revealed that typical Hangouts can’t be recorded, but Google Hangouts on Air can be. Hangouts on Air (HoA) are typically reserved for live interviews that are streamed directly to an organization’s YouTube channel. But we learned that it’s possible to set up an unlisted HoA that records a private video for later internal use. We enlisted a good friend to serve as our first test subject, and we decided to give it a shot.
Testing
Our first interviewee borrowed a school Chromebook to talk with us. Hangouts comes preloaded on Chromebooks, so all she had to do was click her invite link. No muss, no fuss. Our second teacher signed in using IE, and was required to install a plugin before he could begin. He didn’t have any trouble, but this could be a problem for less tech-savvy individuals or someone without the permissions to install any new software on their computers. It remains to be seen if this will prove insurmountable barrier for any future interviews.
Based on the experiences we’ve had using HoA for interviews and testing so far, we’re very pleased with the results. Because everything is recorded and uploaded directly to YouTube, we don’t have to take notes during the testing, which allows us to engage more deeply with the conversation and worry about transcribing later.
Our first test subject told us after the fact that she’d been a little nervous about the usability test portion, where she would have to enable screen sharing to view with us, but she ultimately found the experience to be dead simple, and she needn’t have worried at all.
Indeed, this has been our impression as well: the initial setup for this system can be a little finicky, but once that’s done, everything else works exactly as it should. Below, we detail the steps we took to get everything up and running.
How to Set Up and Record Google Hangouts on Air
1. Create Google+ and YouTube accounts for the organizer.
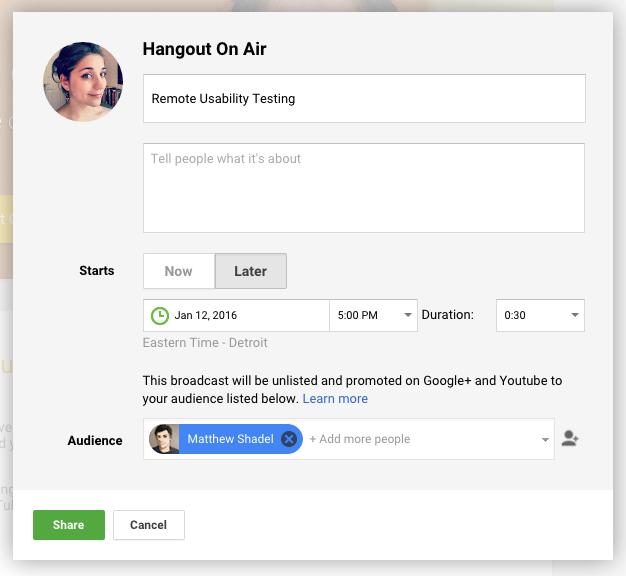
2. Visit the Hangouts on Air page and schedule a Hangout for the time of your usability test. Your YouTube account will need to be verified with a phone number or email; you will be prompted to do this the first time you create a Hangout on Air.
3. Remove “Public” from the Audience box in order to record an unlisted YouTube video. Note the terminology: “Audience” are viewers, not participants. You will invite your interviewee later. The HoA set-up does require you to invite at least one person–other team members who might want to observe the test, for instance, or just a different email that you own. After entering audience members, click “Share.”
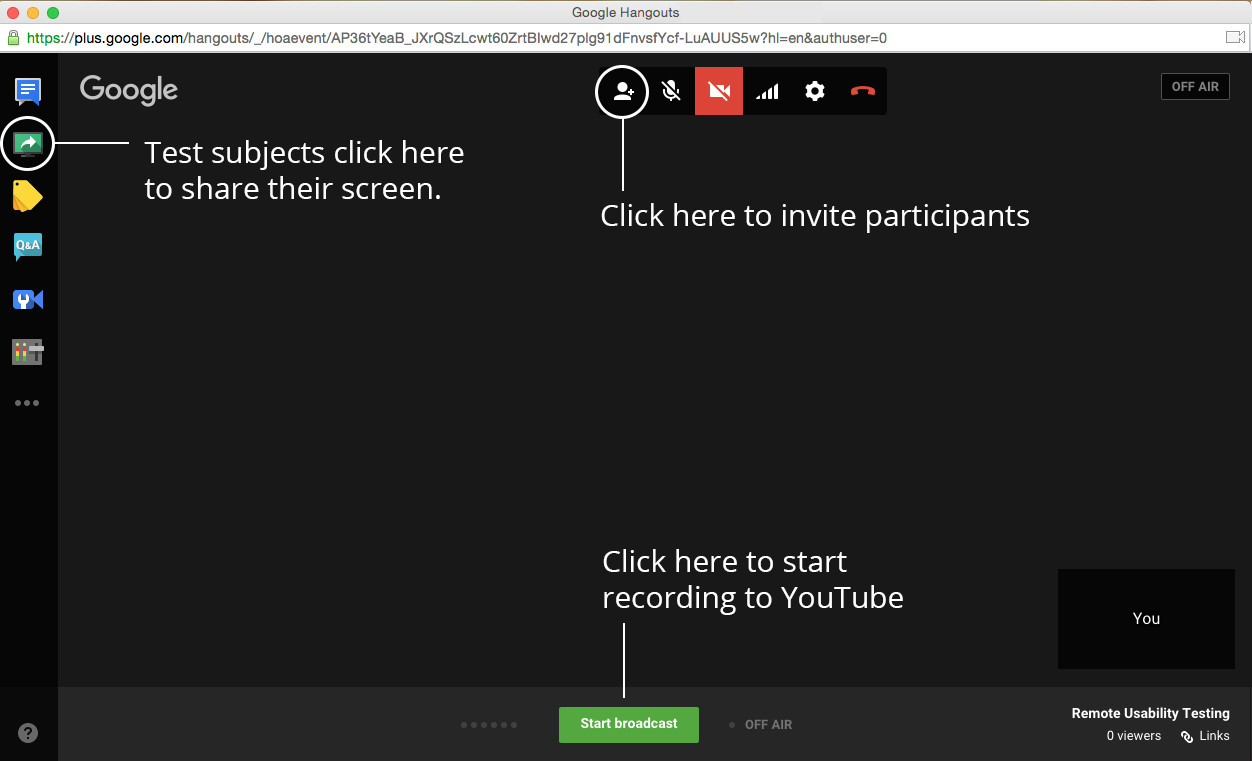
4. You will be redirected to your Google+ page, with the event video viewable. Use the blue “Start” button to launch Hangouts. This launches you into the Hangout window, but will not yet begin recording to YouTube (what Google calls Broadcasting). You can enter and leave the Hangout freely before the Broadcast begins.
5. Hangouts will offer to help you invite audience members, similar to the process in Step 3. Click “Skip” to proceed directly to the Hangout.
6. Once, inside the Hangout window, use the “Invite People” icon at the top of the screen to invite your participants. Copy the link and send it to your test subject. You can do this at any time after scheduling the Hangout; we’ve been sending an intro email to participants several hours ahead of time that includes the link.
7. Once your participants have arrived, use the green “Start Broadcast” button to begin recording. Note: Once a broadcast has started and stopped, that particular Hangout cannot be accessed to broadcast again. Only start the broadcast when you are ready to begin recording.
8. Your broadcast will be automatically recorded to the YouTube channel you set up, where you will be able to view it within minutes of ending the HoA.
Remote Usability Testing with Hangouts on Air
1. Once you’re in the Hangout with your test subject and ready to guide them through usability tests, direct them to open the site you need tested in a browser window.
2. Instruct them to wiggle their mouse to reveal the Hangout’s in-app settings, and click the green button that appears on the left side of the screen to share their browser view. You should be able to see their screen and cursor.
3. Proceed with the test as normal: give them tasks to complete, ask them to narrate their thought process, and otherwise do all of the things we learn from chapter nine of Don’t Make Me Think.
And there you have it: free, recorded remote usability testing with few technical requirements, thanks to our don’t-be-evil overlords at Google. Thoughts, tips, questions? Tweet at us!


